| Part of | Spear of Destiny | ||
|---|---|---|---|
| Par time | None | ||
| Secrets | 10 | ||
| Secret level | Yes Accessed from Floor 4 | ||
| Treasure | |||
| Crosses | 15 | ||
| Chalices | 40 | ||
| Chests | 32 | ||
| Crowns | 26 | ||
| One Ups | 5 | ||
| Total | 118 | ||
| Enemies | |||
| Difficulty | |||
| Guards | 7 | 15 | 25 |
| SS | 8 | 14 | 21 |
| Mutants | 22 | 45 | 72 |
| Officers | 7 | 14 | 27 |
| Total | 44 | 88 | 145 |
| Highscore (before bonuses) |
206400 | 229100 | 257700 |
|
Stub
This article is a stub, an article too short to provide more than rudimentary information about a subject. You can help Wolfenstein Wiki by expanding it.
|
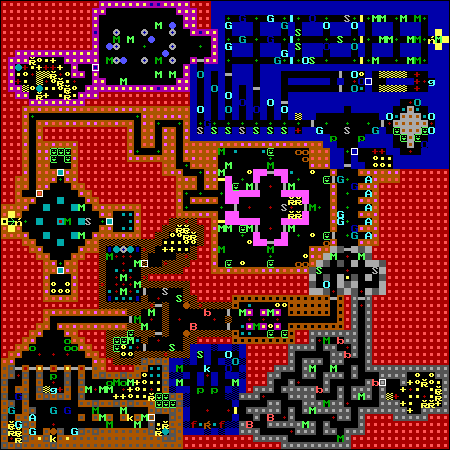
Floor 19 of Spear of Destiny is the secret level in chapter "The Tunnels" and the first secret level in the entire game.
Strategy[]
You start in a room with a few enemies and 9 metal islands in the middle. There's apparently no way to exit this room: there are no doors! There's actually a mandatory secret on the north-western wall of the room that will lead you into an empty and long winding passage way. At its end, there will be two gold doors to your left and right and a regular door in front of you (all three surrounded by pink walls). Open the middle door, but as soon as you fire your first shot it's recommended that you exit the pink area, because several mutants will come for you all at once and the previous narrow passage way provides good protection. Once you've killed everybody, go back into the pink cross-shaped room and open one of the many doors in it (they all lead into the same room). If you hadn't noticed, you've bypassed the two gold doors (even them lead to the same room). Ha-ha. In this room, find the two doors on the brown wall and open either one. The next room contains two doors: open the one between the cobblestone walls. Beyond it is a "maze" (actually, it's just a cramped room with 4 islands in the middle and a few enemies) with two doors. One of them leads to the gold key, the other one to the silver key. Beyond the door leading to the gold key is a small hallway with brown walls. Following it, you'll come across two doors that lead into the same room. This one has two doors in the middle, one to the right and one to the left: open one of the two doors in the middle, then the one in the room beyond. Follow the narrow hallway and you'll come to an area with six doors. Regardless of whether you start from, choose the second door on the wall. The room beyond contains many enemies, so be careful. The gold door is behind a post, and there is really no way to reach it. That is actually a duplicate of the "real" gold key, which is in the same room, behind one of the islands. Ha-ha. Go back to the cobblestone room and open the other door. Beyond it is a narrow grey hallway which leads into a maze with several mutants inside. At the end of the maze is a gold door leading into a blue room. This houses the silver key.
Once you've collected both keys, go back into the room behind the cobblestone "maze" and open the door between the blue walls. In the new blue room there are two doors: open the one to your left. The next area is very reminiscent of the hallways in E6M1 from Wolfenstein 3d, but this time, as soon as you fire a shot, an entire horde of enemies will come against you: it's easy to run out of ammunitions, but there is a box of bullets at the start of the hallway. Once everybody is dead, go inside the 4th/6th hallway to your right and open the door at the end. In the next room, once again, everyone will be alerted to your presence at your first shot. Go past the couple of final rooms (connected by gold and silver doors), then exit.
Secrets[]
1-3. At each corner of the starting room is a secret marked by a metal wall. All three secrets lead into small rooms with a few goodies (chalices, ammo clips and chicken dinners, to be exact).
4. Also, in the starting room is a mandatory secret on the north-western wall.
5. On the way to find the gold key, you'll come across a room with jagged brown rock walls and four doors. Open to door on the far right. In the room beyond is another secret, which contains a handful of treasure.
6. In the gold key's room is a secret on the south-eastern wall. Behind it is a treasure chest, two crowns and an extra-life
7. In the grey maze with the gold door is a secret on the eastern wall. It protects another treasure room.
8. As you enter the first room of the final blue area, turn right and press on the wall to reveal some treasure and a couple of med kits.
9. In the area similar to E6M1, go into the 2nd extension and open the door. In the room beyond are two doors: open either one, then press on a wall marked by a skull. Lots of boxes of bullets, three med kits and the chaingun are waiting for you.
10. In the same area, go into the last hallway and open the door. In the purple room with wells, kill the mutants, then press on a wall on the western wall.
Notes[]
In the room with secret n.5, the red lights on the ceiling form the initials of the map designer's name: Tom Hall.
Map[]
Video[]
")
| Spear of Destiny levels | ||
|---|---|---|
| The Tunnels | Floor 1 · Floor 2 · Floor 3 · Floor 4 · Floor 5 (boss) | |
| The Dungeons | Floor 6 · Floor 7 · Floor 8 · Floor 9 · Floor 10 (boss) | |
| The Main Castle | Floor 11 · Floor 12 · Floor 13 · Floor 14 · Floor 15 · Floor 16 (boss) | |
| The Ramparts and end |
Floor 17 · Floor 18 (boss) · Floor 19 (secret level) · Floor 20 (secret level) · Floor 21 (end boss) | |
| Return to Danger levels | ||
|---|---|---|
| The Submarine Pen | Floor 1 · Floor 2 · Floor 3 · Floor 4 · Floor 5 (boss) | |
| Secret Weapons Research | Floor 6 · Floor 7 · Floor 8 · Floor 9 · Floor 10 (boss) | |
| Atomic Research | Floor 11 · Floor 12 · Floor 13 · Floor 14 · Floor 15 · Floor 16 (boss) | |
| Command Bunker and end |
Floor 17 · Floor 18 (boss) · Floor 19 (secret level) · Floor 20 (secret level) · Floor 21 (end boss) | |
| Ultimate Challenge levels | ||
|---|---|---|
| Computer Technology Labs | Floor 1 · Floor 2 · Floor 3 · Floor 4 · Floor 5 (boss) | |
| Laser Guidance Systems | Floor 6 · Floor 7 · Floor 8 · Floor 9 · Floor 10 (boss) | |
| Satellite Systems | Floor 11 · Floor 12 · Floor 13 · Floor 14 · Floor 15 · Floor 16 (boss) | |
| The Fuehrerbunker and end |
Floor 17 · Floor 18 (boss) · Floor 19 (secret level) · Floor 20 (secret level) · Floor 21 (end boss) | |